Teenage Mutant Ninja Turtles Halloween Group Costume
 This year for Halloween my fiancé, his cousin, her husband and I have decided to go with a group Teenage Mutant Ninja Turtles costume. My fiancé will be the group leader Leonardo, I’ll be the goofy Michelangelo, our cousin will be the nerdy Donatello, and her husband will be the hot tempered Raphael. Now because the boys aren’t too crafty and she’s still in college I’ve offered to make all do the costumes. This will also help with the continuity between characters. I’ve been basing our costumes off of this cartoon, rather than the live movies. Also, because it’s pretty badass.
I have created a separate post for each element if you’d rather see a specific or shorter post. It’s the exact same content per section.
As a bonus, there’s also a short post on how I made a Splinter costume for my dog.
The Chest Muscles
The chest pieces were actually much easier than expected. For them I used:
- 2mm 18″ x 12″ foam sheets in two shades of brown/tan
- scissors
- basic Elmer’s glue
- Brown duct tape
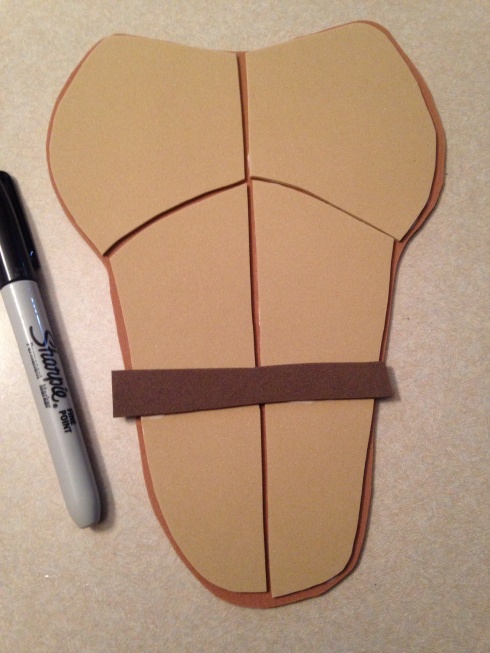
For the girls chest plates I had to tape two foam sheets (four for the boys as shown) together long ways and sketched out the chest shape. After doing this with one color it’s easier to just trace it over to the other. The picture shown was a stencil of my size chest plate on a boy sized sheet.
Once you have the lighter and darker pieces cut out you can decide where you want your muscles. Them, cut up the lighter pieces and trim the edges up just a tiny bit so that when you lay it back down on the darker brown that you can see it around the edges. Then glue it on.
I gave one of them a scar.
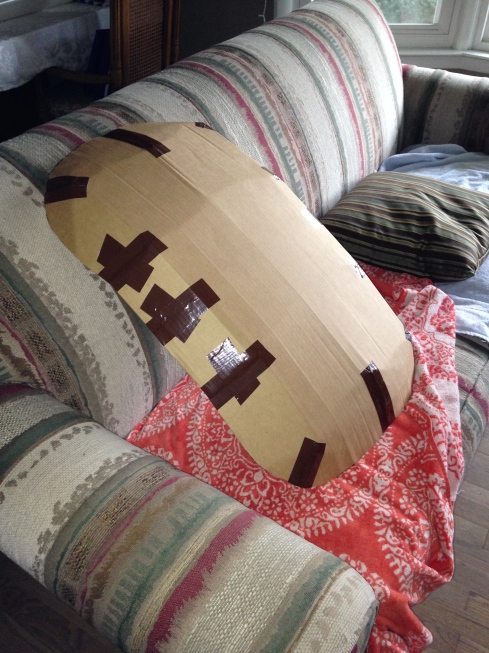
This is my mini mock up, but it’s what the big ones look like too, minus the foam belt.
Be sure to store the chest pieces flat otherwise they could warp. I taped mine to the back of my closet door because then it’d be flat and out of the way.
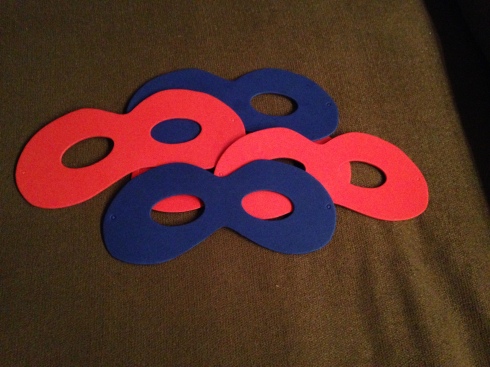
The Masks
The masks weren’t hard, but they were fairly time consuming. For them you’ll need:
- Scissors
- tacky glue
- 2mm foam sheets – I found a pack of foam sheet masks and used them as my model
- fabric – I found plain t-shirts on sale in each color for $3 at Michael’s
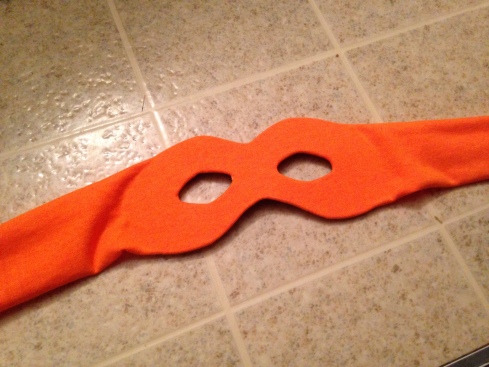
The first step was to take the pre-made masks and adjust them to better fit normal faces. This meant to turn them upside down from what they’re supposed to be and cut some more room out for the nose.
Next I cut off a strip of fabric wider than the mask off of the bottom of the t-shirt. Then, because it’s in a ring, cut it so it becomes just a strip. Next step is to smother one side of the foam mask with glue and stick the fabric to it. Then fold over the edges of the fabric and glue them down. You may have to do some trimming. Do the same with the eyes. To avoid having potentially scratchy and irritating fabric and glue on faces I decided to glue down another trimmed up foam sheet mask to the face side of the mask.
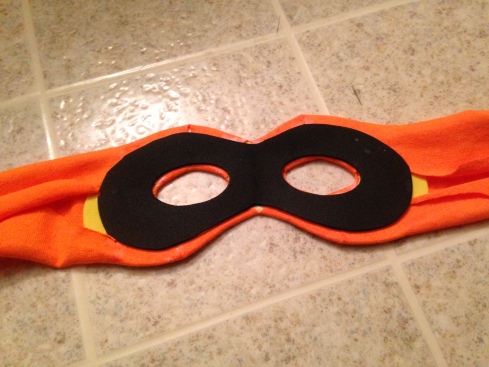
While the glue is drying I found it helps to keep the mask on your face to keep that rounded shape. But be sure to wipe any excess glue off before you put it on your face.
Sorry I didn’t take more how to pictures of this along the way.
The Shells
Now the shells were a little tricky to start, but once I had a plan it got easier. You’ll need:
- duct tape
- large pieces of cardboard
- hot glue gun
- spray paint
- paint
- paint brushes or sponges
- utility box knife
- cutting sheet/board
- elastic 1″-1.5″
- tacky glue
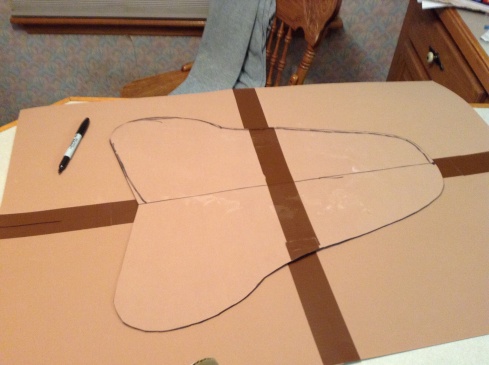
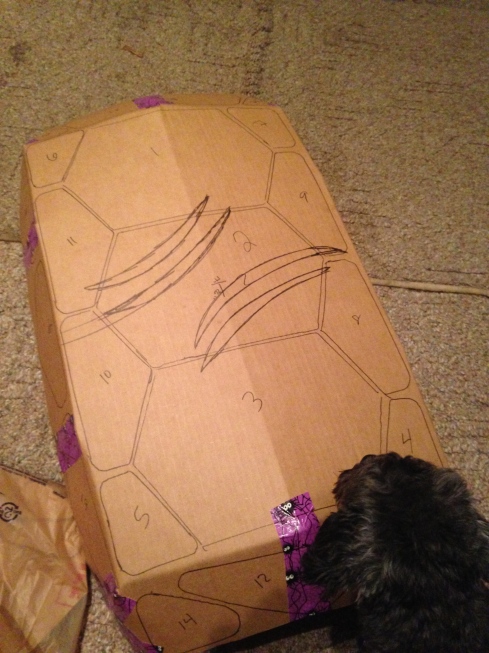
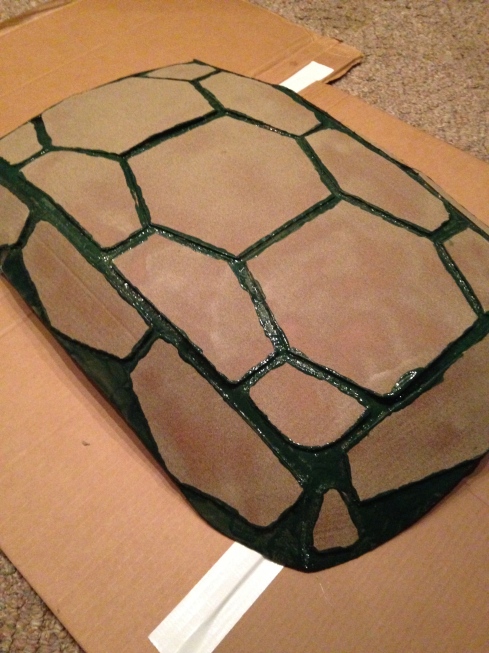
Fortunately for me, my fiancé can get very large pieces of cardboard for free, but there are plenty of places that will give you big cardboard boxes for free. Try places that sell large appliances (i.e. fridges, ovens, large car parts). Measure the shell wearer with their arms down from the outside of one arm, across their back, and to the outside of their other arm. Then from their neck to the bottom of their butt. Cut out a rectangle of cardboard and add two-ish inches to your previous measurements. So, my fiancé measured 22″ x 32″ and his piece of cardboard was 25″ x 34″. Keep in mind that my fiancé is 6’6″ so don’t base your measurements off of his. I’m 5’7″ and mine was 22.5″ x 32″. Next make lines about 4″ in around the entire shell rectangle.
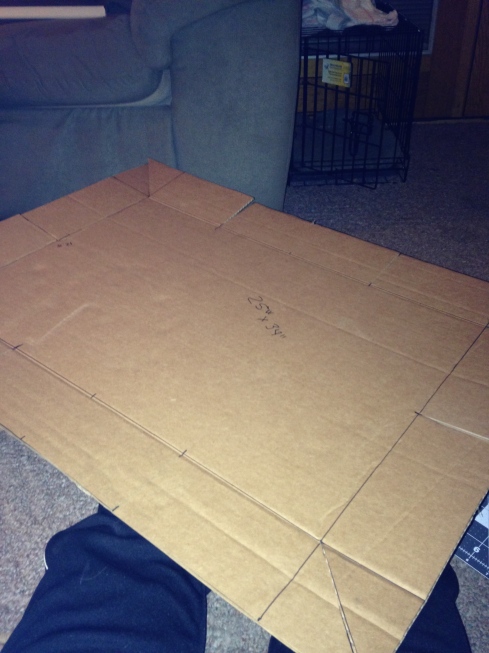
You’ll then want to make lines in the corners, diagonally, where you’re going to cut (as seen above). Then also on each short side directly in the middle. On the long side you’ll need to make two lines evenly spaced out within the 4″ margins, so that 26″ space of the 34″. Cut along those lines. You’ll then need to slightly overlap those cuts so that it causes the shell to bubble a little bit. Duct tape them to keep them where you want them.
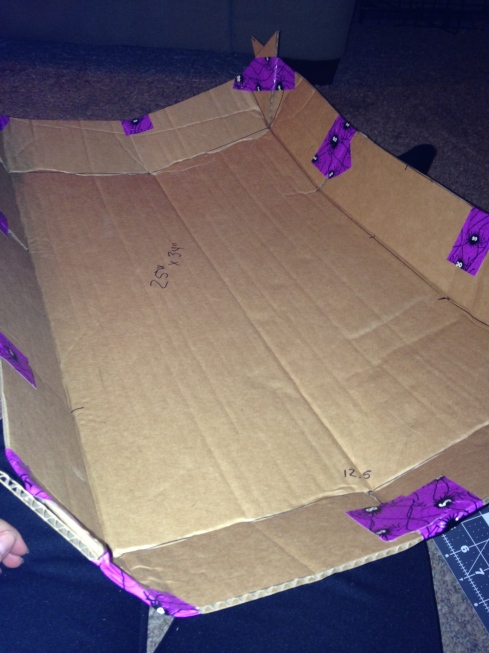
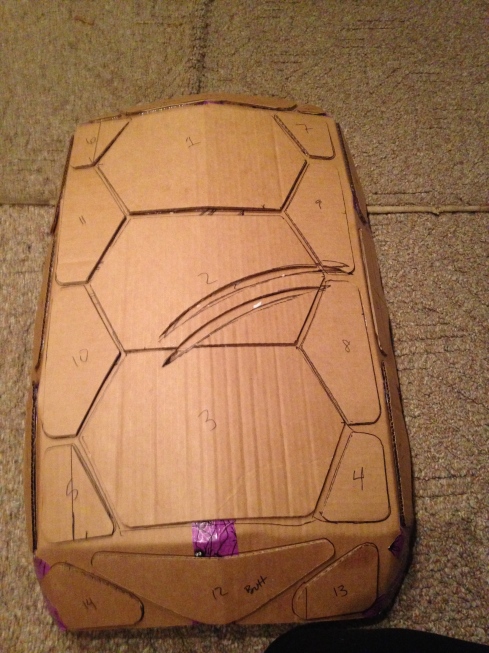
Trim the corners so they’re round. It should look like this now.
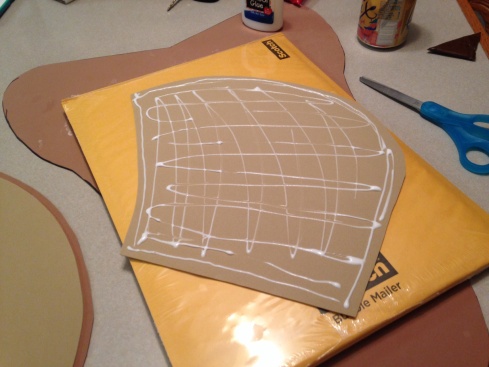
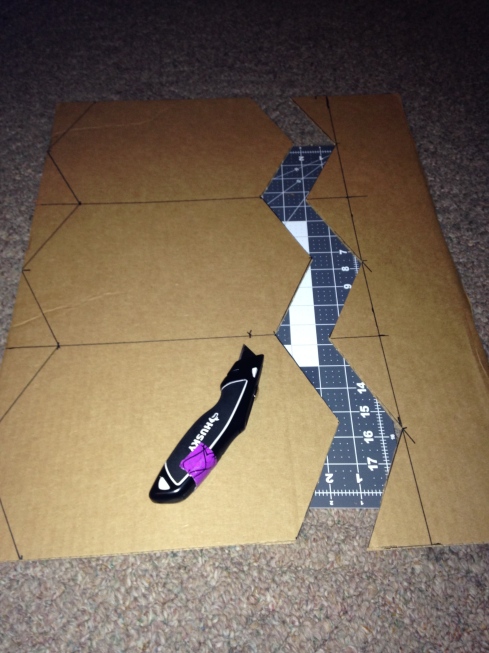
The next step is to begin cutting out the pieces you want to use for the shell decoration. After doing some googling it seemed that hexagons were the way to go. Being more geometric actually made it easier. Now, these aren’t perfect hexagons by any means, but the three middle ones are all the same size.
I was also able to use the remnants of the hexagons to make the other shapes for the shell.

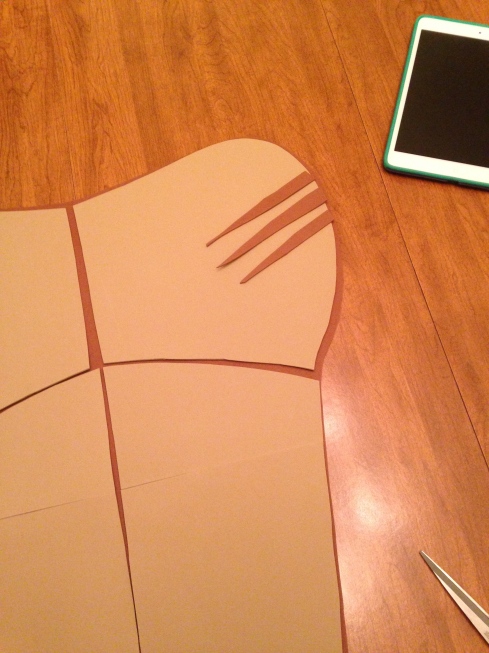
I also found that it helped to prearrange the pieces on the cardboard shell to make sure I had enough and that they would all fit together.

It might even help to do some sort of paint by numbers method, where you trace the piece on to the shell, then number each so you can glue it on later. This helps ensure that you know where your pieces are going, which will reduce any potential mess ups. My fiancé’s shell is getting a scar.
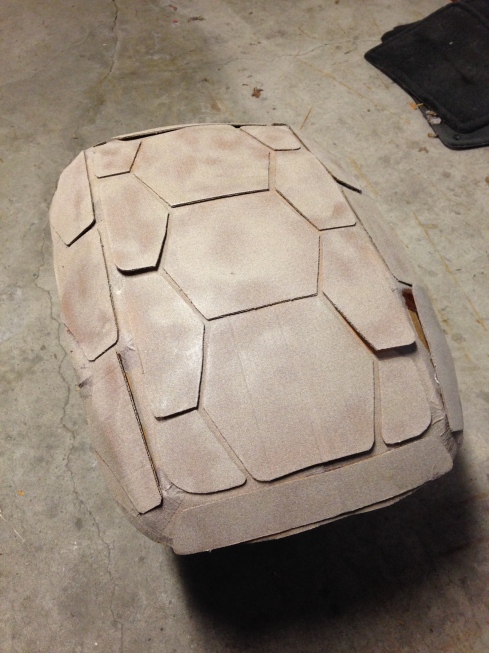
Once I had everything where I wanted it, it was time to hot glue it all down. I did learn at the painting process that some of the pieces wanted to come loose and had to be reglued down. So extra glue is not a bad thing.
From that point I knew I didn’t want the cardboard color to be the shell color so I looked up spray paints that appear to have some texture. I discovered Krylon’s Natural Stone spray paint. Pebble looked the most turtle shell-y to me so that’s what I got. I had to use the entire can on just my sized shell, so stock up on your craft store coupons. You can see where some of the pieces have popped up a little. And learn from my mistakes, if you do go with the outline and number system that I did, don’t use a sharpie because it takes more paint to cover that up. Just use a normal pen or pencil.
After a lot of fretting over the lightness of my shell color I decided to stick with it and paint in the shell plate cracks with a green/black mix to give it a more defined, turtle-y look.
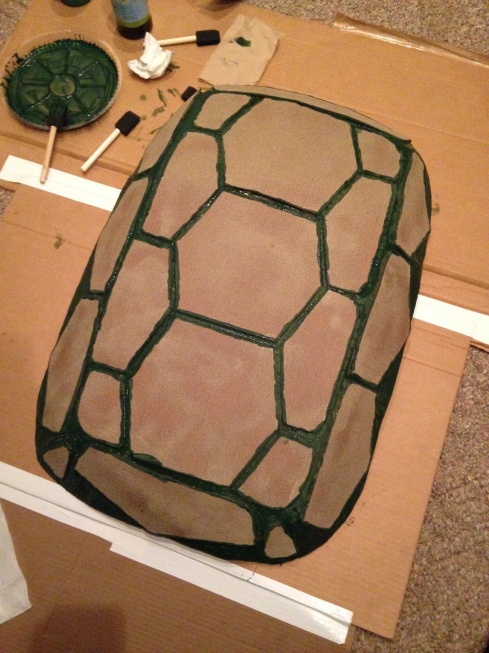
And don’t worry if the edges get a little sloppy, the imperfect edges make it a little more realistically turtle looking. It only looks iffy up close.
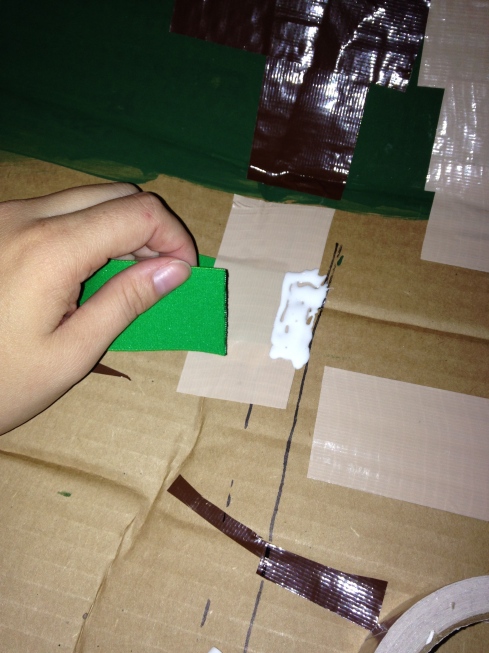
I found some soft green elastic at Jo-Ann’s to use for the straps to attach the shell to the people. It was fairly easy too. They were attached similarly to backpack straps. I used tacky glue and duct tape to make sure the straps stuck. A good way to find the placement of the straps is to have someone hold the shell for you and just make a dot right under your armpit.

The Weapons
The weapons were probably the easiest part of this entire costume/project.
You’ll need:
- fabric in red, orange, purple, and blue
- tacky glue
- dowel rod
- 2 nunchucks
- 2 sais
- 2 katanas
I didn’t take many pictures along the way, but it’s all pretty easy. I found the dowel rod at Home Depot for $4 then the nunchucks, sais, and katanas on Amazon all for pretty cheap. As a heads up though, when you order your weapons online make sure it actually comes with two. Most will show two in the picture, but it’s actually only selling one.
You’ll start by figuring out where you want your fabric, which is usually where you will be holding the weapon. Cut a strip of your colored fabric, I used leftovers from the masks, and begin to tacky glue it to the weapon. It’ll look messy at first, but once the glue dries it will look fine.
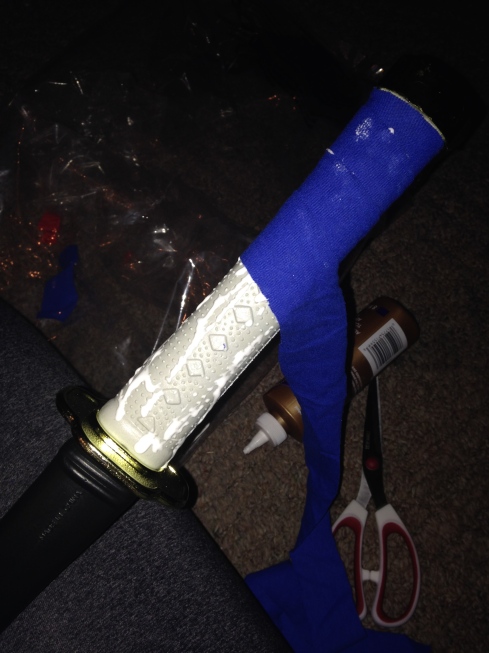
Once you’re all done with gluing on your fabric strips let the glue dry over night. Then, enjoy!
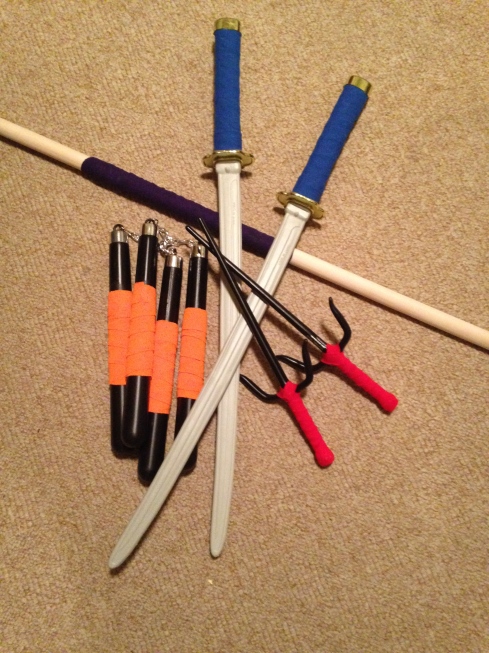
I would’ve liked to have wrapped the entire nunchuck handles in the orange fabric, but I didn’t have enough. If you plan accordingly you can do that. Also, I know the sais and katanas are supposed to be more silver, but we were going for cheap but still gets the point across. If you’re feeling it you could always paint them more silver, and stain the dowel rod darker, and paint the nunchucks brown.
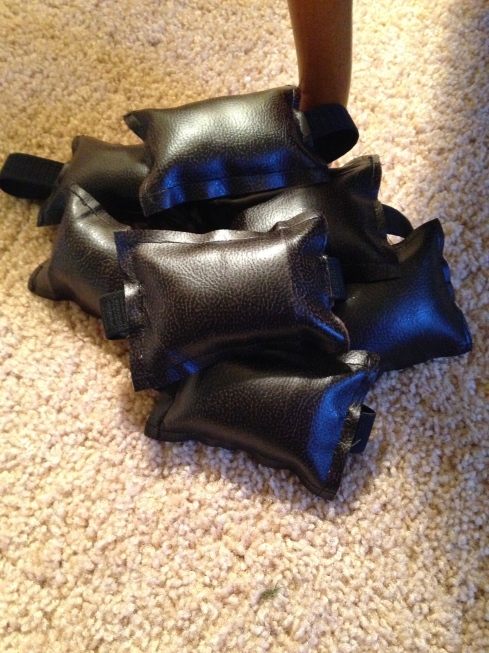
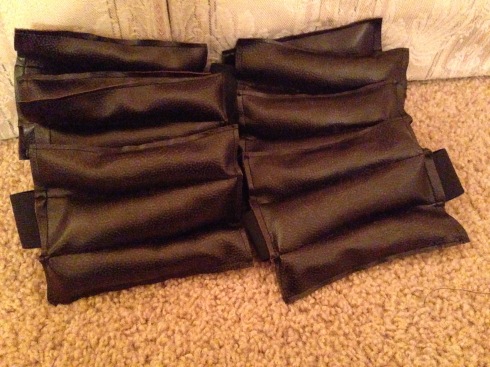
The Elbow and Knee Pads and the Belts
The elbow and knee pads are made exactly the same way, just different sizes. And I’ve included the belts in this section, because it wasn’t enough work to get it’s own section.
You’ll need:
- scissors
- sewing machine (or needle and thread)
- 1.5″ elastic
- 3/4″ elastic
- brown leathery looking fabric – 2 yds
- plain brown fabric
- cheap stuffing
- a ruler or some type of measurement device
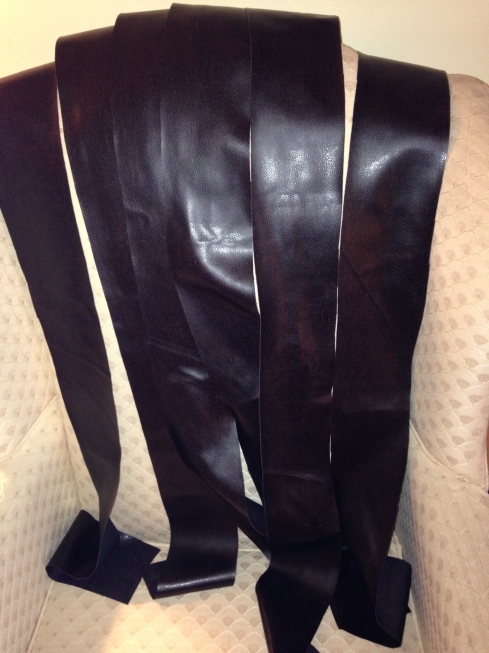
I purchased two yards of a faux leather looking fabric to use for the elbow and knee pads and the belts. I started by cutting out the belts, which were the full 2 yards in length and 4″ in width. This way they’re thick enough to be significant, but thin enough to tie in a knot. I cut out six just in case there were some belts that weren’t long enough, then I could just sew two together. And also because Leonardo has a strap that goes over his shoulder along with the one around his waist.
Next, for the elbow and knee pads. These were made almost exactly the same way so the pictures are interchangeable. There is one difference that I will mention shortly.
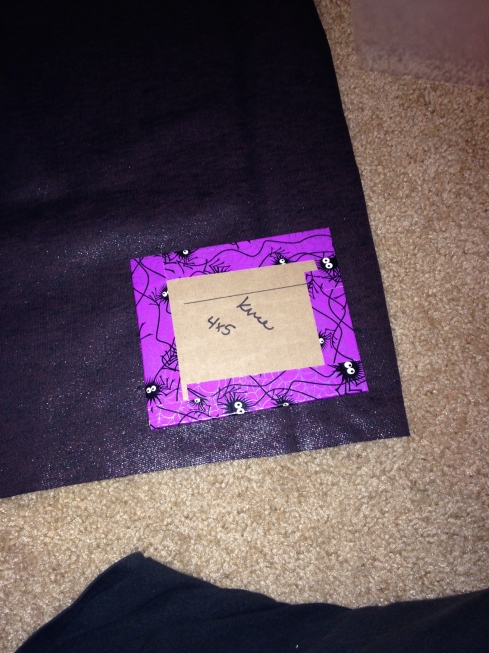
I measured my fiancé’s knees and elbows and mine and decided on a happy medium, because I was trying to mass produce these so they were going to be the same size for everyone. I decided on 5″x6″ for the knees and 3″x4″ for the elbows. I even made templates out of cardboard to help me cut out the right size fabric. Although I didn’t have that much extra around the edges when I cut mine out.
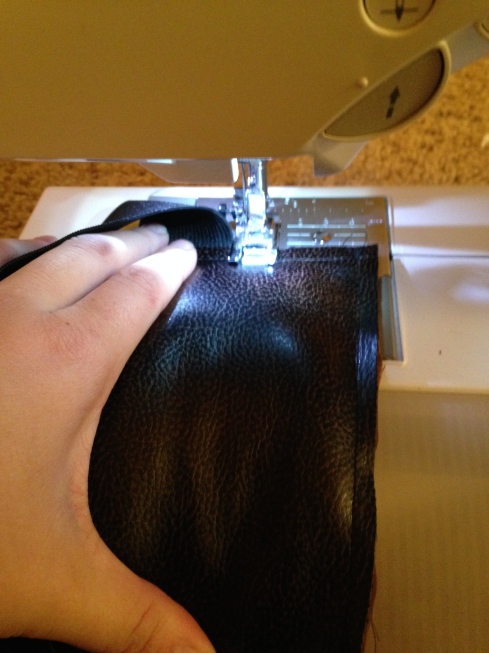
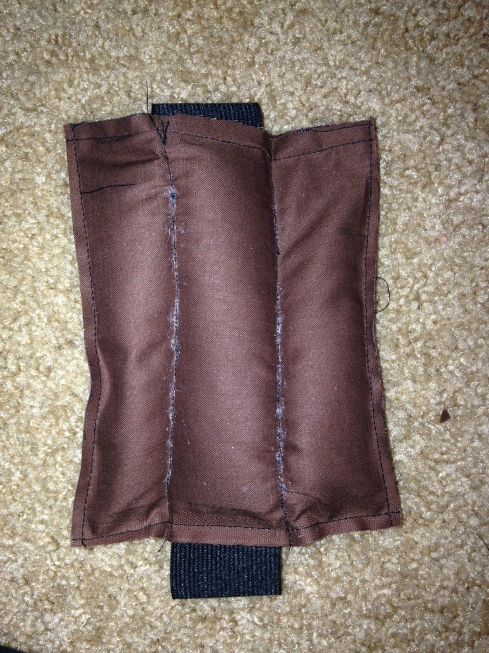
Because I made the costumes for all four of us, I cut out 8 pieces of both the leather and plain brown fabric each for the elbows and knees. The next steps was to match them up and sew up the long sides.
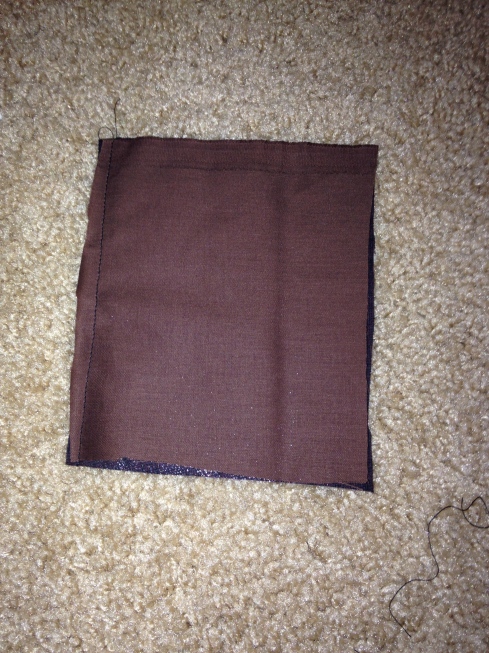
I then opened up one of the shorter sides and inserted the elastic about 1/3″ in and sewed up that side. I used 11″ of 1.5″ elastic for the knee pads and 8″ of 3/4″ elastic for the elbow pads. I found both at Walmart.
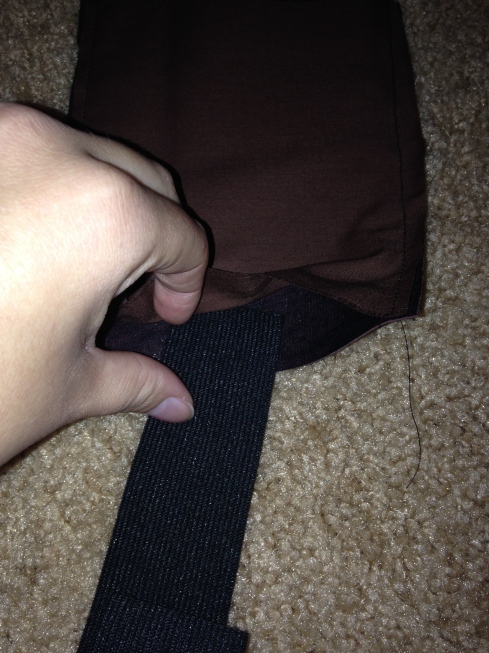
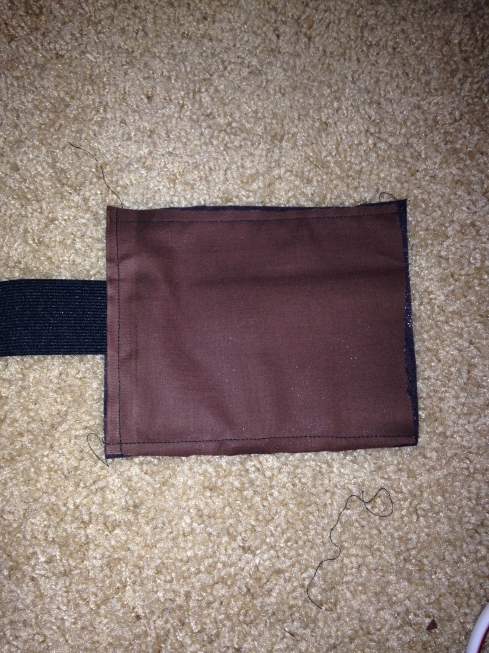
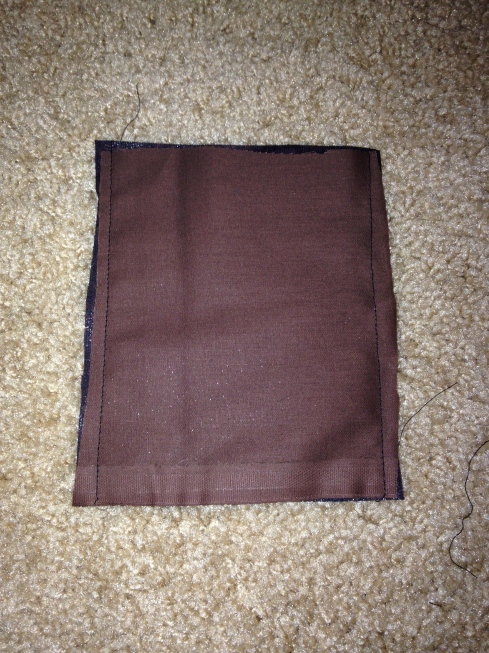
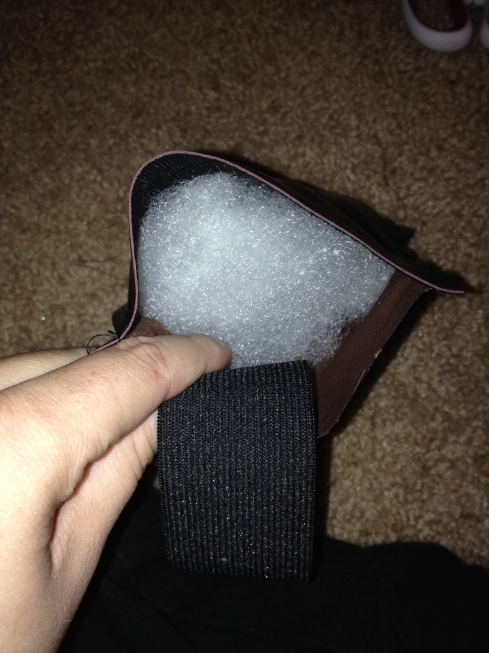
I then stuffed it, but not so it would be too full, just to give it some dimension. Then I inserted the other end of the elastic in to the open side and sewed that up as well.
There is where I ended with the elbow pads. Although I would’ve liked to add the accent lines, my sewing machine couldn’t handle it so I called it good.
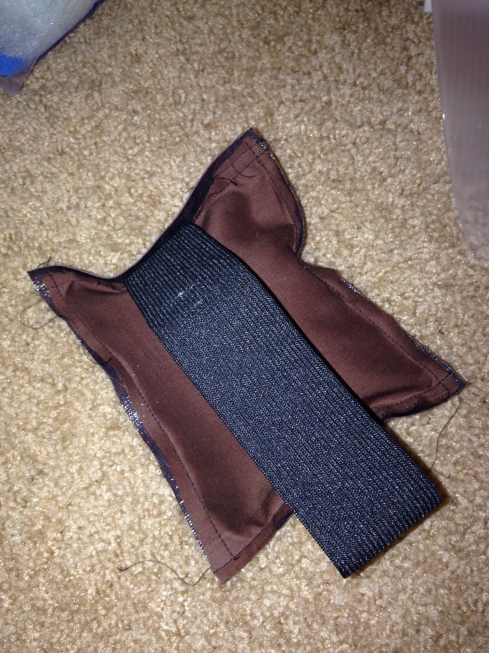
For the knee pads I wanted to add the accent lines so that it would look like there were three sections like my example picture up top. To do this I simply sewed across the top of the knee pads I had just made. Keep the good side up when you sew because stuff will pop out a little on the side that’s on the bottom. It’s normal, just not so attractive on the good side.
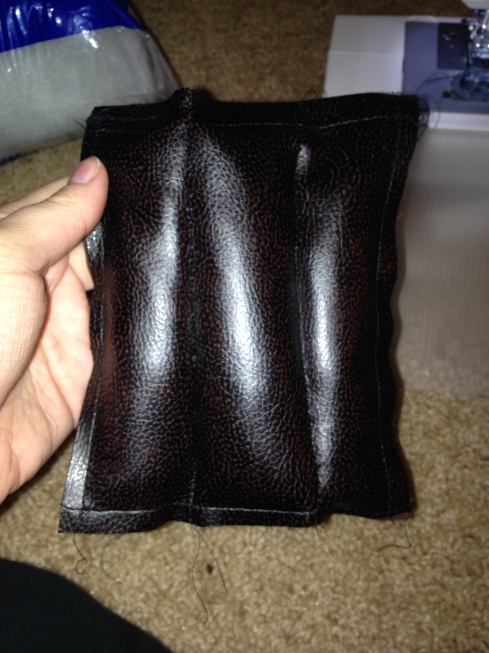
When you sew these lines across the top keep in mind that I am not a perfectionist. The padding wasn’t all the way in the corners so some of them are a little flatter. And because the pads are stuffed it made it a little trickier to sew in straight lines. If you are a perfectionist, I’m sure you will find a way to make everything symmetrical, but it’s not the easiest thing and I just wasn’t worried about it.
Our party isn’t until tomorrow, but here’s my finished Mikey costume. Check back on Sunday for group pictures and full costume shots.

TMNT Chest Muscles
 As part of my Teenage Mutant Ninja Turtles group Halloween costume, here’s how I made the chest muscles. We have two boys and two girls for our turtle-y group, which means the whole chest plates were different sizes for almost each person.
The chest pieces were actually much easier than expected. For them I used:
- 2mm 18″ x 12″ foam sheets in two shades of brown/tan
- scissors
- basic Elmer’s glue
- Brown duct tape
For the girls chest plates I had to tape two foam sheets (four for the boys as shown) together long ways and sketched out the chest shape. After doing this with one color it’s easier to just trace it over to the other. The picture shown was a stencil of my size chest plate on a boy sized sheet.
Once you have the lighter and darker pieces cut out you can decide where you want your muscles. Them, cut up the lighter pieces and trim the edges up just a tiny bit so that when you lay it back down on the darker brown that you can see it around the edges. Then glue it on.
I gave one of the chests a scar.
The final product will look like the mini mockup I have up at the beginning of the post. Minus the belt though, that’s a separate piece that will go around the shell too.
Be sure to store the chest pieces flat otherwise they could warp. I taped mine to the back of my closet door because then it’d be flat and out of the way.
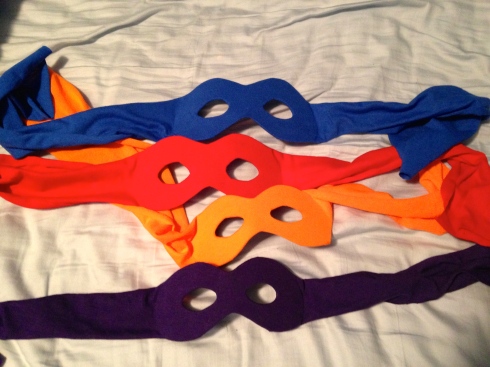
TMNT Masks
As part of my Teenage Mutant Ninja Turtles group costume series, here’s the masks.
The masks weren’t hard, but they were fairly time consuming. For them you’ll need:
- Scissors
- tacky glue
- 2mm foam sheets – I found a pack of foam sheet masks and used them as my model
- fabric – I found plain t-shirts on sale in each color for $3 at Michael’s
The first step was to take the pre-made masks and adjust them to better fit normal faces. This meant to turn them upside down from what they’re supposed to be and cut some more room out for the nose.
Next I cut off a strip of fabric wider than the mask off of the bottom of the t-shirt. Then, because it’s in a ring, cut it so it becomes just a strip. Next step is to smother one side of the foam mask with glue and stick the fabric to it. Then fold over the edges of the fabric and glue them down. You may have to do some trimming. Do the same with the eyes. To avoid having potentially scratchy and irritating fabric and glue on faces I decided to glue down another trimmed up foam sheet mask to the face side of the mask.
While the glue is drying I found it helps to keep the mask on your face to keep that rounded shape. But be sure to wipe any excess glue off before you put it on your face.
Sorry I didn’t take more pictures along the way.
